Digital Toolbox
Week 1- Stonehenge Exercise
In week 1, we began with a brief introduction to Adobe Photoshop. We begun with a simple removal of sky in the Stonehenge image given in this task and replaced it with a stormy sky. We used various tools such as the 'magic wand' and 'quick selection'.

Original Stonehenge Image

Original Stormy Sky Image

Final Image

I also added a few extras such as a Sharpen Filter, by doing this it made the Stonehenge 'rocks' in the image stand out. I then added two gradient map adjustment layers in order to help the whole image blend in with one another making the image look natural.


The adjustment layers ended up overpowering the image, to sort this out I then adjusted both the blending modes for the gradient maps and then decreased the opacity.
Introduction To Maya: Basic House Render
In Maya the task set was to create the simple shape of a house, the image below is what I created for my house in Maya, I used a total of two cubes to create the house, and used various tools to change the shapes, as well as changing a few vertex's in order to get the shape I was looking for. I then used an Arnold light for the light source in order so you could see what I modelled once rendered. I also rendered the final image using Arnold Render settings. I found rendering my model in normal general settings really grainy and a little pixilated; when I switched to Arnold render settings my model looked of a much better quality.

- - - - - - - - - - - - - - - - - - - - - - - - - - - - - - - - - - - - - - - - - - - - - - - - - - - - - - - - - - - - - - - - - - - - - - - - - - - - - - - - - - - - -
Week 2- Green Screen Removal
In lecture we replaced the green screen background of an image where a lady was standing in (image below). I replaced the green screen with a stock image of a sky, To do this I used the quick selection tool, the quick selection tool selects all the same/similar colours around the canvas on the selected layer, there were still a few green pixels in the image when zooming in, to get rid of this I added a Hue/Saturation adjustment layer selected the green swatch and reduced it till all the green was removed.


These two images are above are the images I used and merged together to create the image below.

Green Screen Photo Manipulation


Above are the three images given, the brief was to create an abandoned building, I used a few techniques such as the removal of green screen, playing with the different blending options. I also learnt how to import brushes into Photoshop. I then used the smudge/blur and burn tool on the brushes layer that I created to give a 'grungy' type of look. I then applied a few adjustment layers- Gradient Map to change the contrast of the image, curves & Hue/Saturation to change the lighting of the image.
Image below is what I produced:

- - - - - - - - - - - - - - - - - - - - - - - - - - - - - - - - - - - - - - - - - - - - - - - - - - - - - - - - - - - - - - - - - - - - - - - - - - - - - - - - - - -
Week 3- Spaceship Moddelling Maya
Week 3 we jumped straight into Maya, the brief was to design a spaceship. To do so I began with starting with a rectangular square object, I selected the faces of the cube that I wanted to alter and began by extruding; I did so until I eventually got a shape of a spaceship that I was happy with. I then used the smoothing tool to see how the spaceship would look when smoothed down. Once I was happy with the final outcome, I then got a HDRI 4k image for the background. I then added an Arnold material and applied it to my spaceship and then rendered out my image.
Image's below show my final composition, I was going for a simple clean look on my spaceship. I was going to apply a chrome type of finish for my spaceship but then decided against it. The mini 'orbe' in the middle of the spaceship where the pilot would be seated; I was going for a clear frosted glass type of look. The final image of the small hangar is the HDRI 4k background I used.


- - - - - - - - - - - - - - - - - - - - - - - - - - - - - - - - - - - - - - - - - - - - - - - - - - - - - - - - - - - - - - - - - - - - - - - - - - - - - - - - - - - - -
Week 4- Kettle Modelling Maya
In week 4 we created a kettle in class, the reason was to practice modelling objects in order to practice for assignment 1 (Spy Gadget). Creating the kettle was quite simple. The key is the just keep practicing so you know what each tool does. Unfortunately Autodesk Maya crashed before I was able to render anything.

- - - - - - - - - - - - - - - - - - - - - - - - - - - - - - - - - - - - - - - - - - - - - - - - - - - - - - - - - - - - - - - - - - - - - - - - - - - - - - - - - - - - -
Week 5- Modelling & Rendering Techniques
Week 5 we learnt modelling techniques in Autodesk Maya, I took screenshots to show what we did an what I learnt.

I used a bend technique for the image to the left, I did this by selecting the deform attribute option
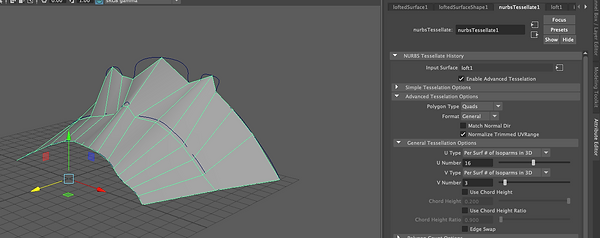
The image to the left was created by using the loft technique. I created 3 curves to the loft surface. I then reset the shape to default settings then went to select the 'quads' option and played with the settings to create this cool shape

To create this vent looking shape I used the wedge technique. I did this by creating a Cube> Scaled>Multi Option> Wedge. Then I played around with the settings and added divisions to get this shape
I used the Boolean technique to create the images below; To create this I created a cube & sphere. Then used the following commands: Menu>Boolean> Union.
There are three different options which you can choose from the Boolean menu: Union, Difference & Intersection


To the left I created a pot, to create the initial shape I used the CV Curve Tool. Once I had the shape I smoothed the object and used the 'revolove options' to get the pot like shape

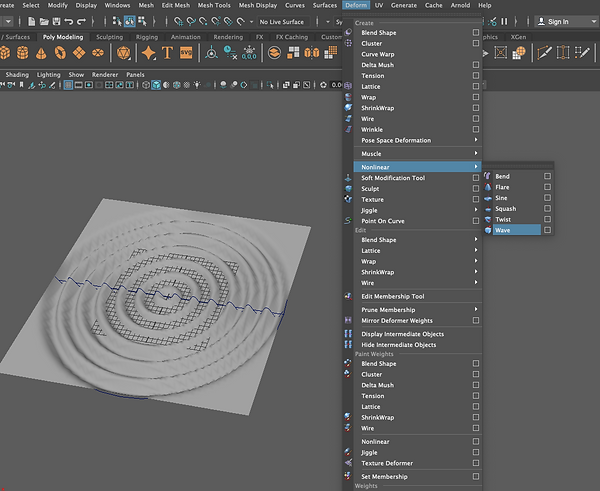
I created this cool ripple effect on the left by creating a Plane and then selecting the Deform tab and then going into Nonlinear. I then selected 'Wave' which gave me the effect after adusting a few settings, However there are a number of different Nonlinear options to choose from such as: Bend, Flare, Sine, Squash, Twist & finally the option I chose 'Wave'.

To finish tings off after using all the various techniques above, we followed a video tutorial in class that showed us how to create a bond spy gadget. In this case we recreated the phone used in the film which allowed the user to drive the car using the phone.
- - - - - - - - - - - - - - - - - - - - - - - - - - - - - - - - - - - - - - - - - - - - - - - - - - - - - - - - - - - - - - - - - - - - - - - - - - - - - - - - - - - - -
Spy Gadget Assignment
For this assignment I decided to make a coffee cup that transformed into a telescope, The cup also reads the temperature of the liquid contents inside and is indicated with a red LED when the gadget is disengaged; and green LED when the gadget is engaged and the temperature changes into the trajectory of the direction the scope is facing towards. When designing my gadget I tried to make the strip where the LED's/thermostat was a frosted glass materiel. I used various techniques taught in lecture to produce the final outcome; below are the three renders I created of my gadget.

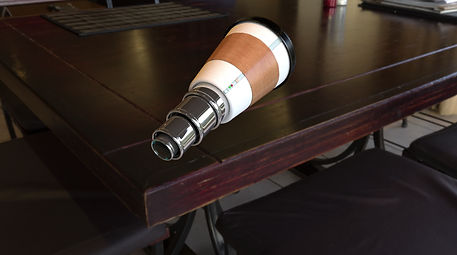
Coffee cup with red LED and thermostat
Coffee cup with green LED indicating gadget is active, and thermostat changing to trajectory of scope

View of cup lid w/ red LED active to show the gadget is disengaged; with tiny incision at the top of the lid so hot air can escape from the cup

I then began modeling the second cylinder to the specifications of the cup adjusting the thickness and shape, I flicked though wire frame so the cup was level and lid (second sphere) sat on the cup and also checked the smoothing mode to see how the cup would look once it was smoothed out.
To begin I created two cylinder shapes, I then adjusted the vertex's on the first cylinder until I got a shape I was happy with; to add detail to my cup I used the 'Insert Edge Loop' tool, this tool allowed me to define the shape I was going for. The second cylinder was used to create the top lid for my coffee cup;


I then used the extrude function to push down the top of the lid, I then went into the side view and adjusted the vertex so the lid had a tiny slope. Then I went into the top view and made a tiny incision once again playing with the vertex mode; once I was happy I used the face mode and created a hole for the lid; which would also be the part which you look through to see into the telescope.


I then created another cylinder, I was attempting to create a corrugated card from where you hold the drink to stop the heat from burning your hand. I first resized the cylinder making it fit around the cup, then I began to extrude and thin down the cylinder so it looked like a piece of card; then went into the vertex mode and adjusted the vertexes in order to get a snug fit on the cup; and I finished the modeling process of my coffee cup.


Finally I got to the main part of the assignment which was the gadget; I decided create a telescope, at first I came up with a very simple design for the scope, I began by duplicating the cup four times and resized it, however when I smoothed out the final image something about it just seemed so off.

As I wasn't happy with the final outcome I decided to scrap the concept and start from scratch, I did this by create a 'Pipe' shape, I then reduced the thickness and used the 'Insert Edge Loop' tool in order to help me get more definition. Once I got the shape I was aiming for I duplicated the shape and scaled it up multiple times until I replicated the look of a scope. I was then going to make a lens for the scope using a technique taught in lecture for the spy cup. However when I created it the lens seemed to make the gadget seem a bit unorthodox. So I created a thin type of lens using the 'Sphere' shape, I then trimmed it down and then added a see-through glass material; attached it to the bottom of my cup and there I had my gadget!
After texturing my gadget and rendering out the images it seemed really plain so I decided to add an Arnold 'Sky dome' light source and added in a HDRI 4k image, which I got from HDRI Haven; just like I did with the spaceship modelling we did in lecture.


First concept of scope, duplicating the cup

4k HDRI image obtained form HDRI Haven

Spy cup lens I was referring to above, from previous in class work
- - - - - - - - - - - - - - - - - - - - - - - - - - - - - - - - - - - - - - - - - - - - - - - - - - - - - - - - - - - - - - - - - - - - - - - - - - - - - - - - - - - - -
Fake News Assignment
In this particular project, I put together some images of my choosing together in Photoshop and make it look as if it was one photoreal image. I used some techniques taught within the lectures and also used a selection of tools to get my final image, smudge, burn, brush, clone, pen tool and various other tools; followed by using a few filters such as gaussian blur & sharpen filter and finally added a few adjustment layers such as gradient map, curves and hue saturation to make the image blend in together. When doing this assignment I was going for an apocalyptic theme, with the city in total chaos and is flooded, the focal point was 'Tower Bridge' and 'The Statue Of Liberty' washing up into London.
Below are a few images and screenshot, with annotations explaining my thought process when designing.

Final Image

Original Image

I began by using the clone tool in the highlighted areas above, to take away the top portion of the ship and the bottom right corner dock area near the ship. I also touched up the sky as the original image seemed to be a little pixelated.

To the left is an image of 'The Statue Of Liberty' that I used, I then started breaking it into pieces using tools such as the rectangle marquee tool, certain portions of the statue was a little difficult to break up with the tool so I used the pen tool to create a custom selection. When breaking the statue into pieces I found it a little challenging to break it up while maintaining a photoreal effect. To the right is my version of the 'The Statue Of Liberty'; I then used some stock .PNG images of cracks & lightning which I then played with the blending mode settings to make it seem the statue was cracked, and so the scenery looked like it had lighting in it as I was going for a stormy atmosphere.
Below are images of the cracked & lightning stock images I used and then set the blending mode to 'Screen', this gave a surreal cracked effect on the 'Statue Of Liberty'.


I then added a displaced filter to the image as it made the scene seem chaotic, and then added a tiny boat stock image marked with a circle in the screenshot below. I then added rain and set the blending mode to 'screen' and added a stock image of waves and lowered the opacity on the layer; this gave the illusion that the main boat from the original stock image I used was under water.
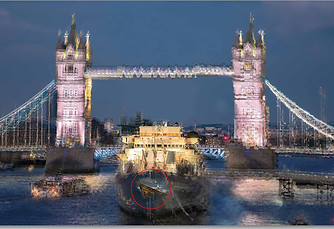
Displaced Filter Being Used


Wave stock images with low opacity
I then got an image of a ship and made it look like it'd been ship wrecked, then I got a soft brush and colored over the ship with a blue'ish color to make it fit the color scheme and then reduced the opacity and changed the blending mode to hard light; finally I created some adjustment layers and used a soft brush to create a light source and set the blending mode to soft light.

- - - - - - - - - - - - - - - - - - - - - - - - - - - - - - - - - - - - - - - - - - - - - - - - - - - - - - - - - - - - - - - - - - - - - - - - - - - - - - - - - - - - -
New York Roof-top Mood Board/Brainstorm
Before I began modelling my New York rooftop I wanted to start by getting some ideas of what type of scenery/objects I was going to create and place within the scene. I wanted to keep it quite traditional by having the typical water tanks on top of buildings, vents and small type of roof access you get in New York. I also had a look at some landscapes from NY rooftops, I'm thinking about going for a midday sunset rooftop vibe or either a midnight night life look. I was also looking to do something uniqe and create a rooftop casino; which means the level of detail will have to be impeccable and most definitely will challenge my modelling skills.


Few objects/images I'm thinking of creating for my NY Rooftop assignment
- - - - - - - - - - - - - - - - - - - - - - - - - - - - - - - - - - - - - - - - - - - - - - - - - - - - - - - - - - - - - - - - - - - - - - - - - - - - - - - - - - - - -
New York Roof-top Assignment
For my New York assignment, I found it quite challenging, I used the duplicate special feature quite a bit with this assignment as well as the UV mapping for the textures. Almost all the textures I found we're from google images; I used a Arnold sky-dome as the light source and used a HDRI image from HDRI Haven; I also recorded a time lapse for this assignment but unfortunately the file got corrupted.
Final Renders


Wireframes


- - - - - - - - - - - - - - - - - - - - - - - - - - - - - - - - - - - - - - - - - - - - - - - - - - - - - - - - - - - - - - - - - - - - - - - - - - - - - - - - - - - - -
Time Leap Brainstorm
Before I began anything with my time leap assignment I wanted to create a brainstorm/mood board of ideas I was thinking to recreate within Maya Autodesk. More so I wanted to recreate something old school rather than futuristic.

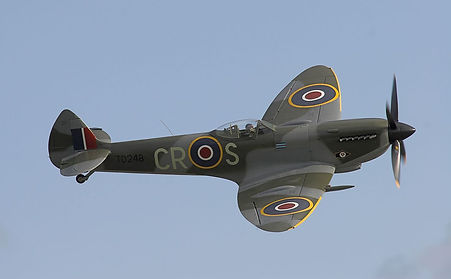


I wanted to create something old school, I wanted to create an old school aircraft/car however after many attempts I found it really challenging, the minute detail especially on the vehicle. After that I thought about a wag water well which is what I ended up recreating.
- - - - - - - - - - - - - - - - - - - - - - - - - - - - - - - - - - - - - - - - - - - - - - - - - - - - - - - - - - - - - - - - - - - - - - - - - - - - - - - - - - - - -
Time Leap Assignment
For my time leap assignment I created a water well. Below I've included images/and a speed edit video of me creating the water well in Autodesk Maya. I used the water well images above from my time leap brainstorm as my reference image.


Water-well Renders

Wireframe Overview

Front wireframe view

Bottom wireframe view

Side wireframe view

Top wireframe view
Speed Edit Video of Water-well
Texture Breakdown-
Textures were all obtained from Texture Haven. I've added a button to where it takes you straight to the source of where the textures I used were obtained from.

Floor tiles for Water well


Wood for structure of Well


Bricks for Well


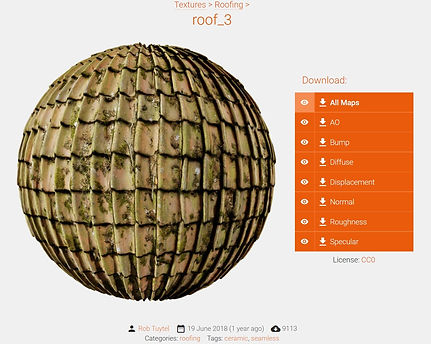
Roof tiles for Water well

Rope for Water well


Stones for Water-well floor tiles to add depth


Stones for Water-well floor Water-well brick work to add depth


Metal for parts of the Well


