CGI Foundations
Week 1- Overview and Intro to Unity
Week one in CGI Foundations we had an overview of what 'Unity' was. Unity is a game engine used to create games, not all games require the use of Unity for it's creation however a lot of programmes used to create games have a very similar interface. Industry also use unreel and some studios such as electronic arts develop their own engines like frost bite for example. Unity was also used in the creation of Jungle Book for the environmental side. From first looks I believe Unity to be really similar to Maya, however from what I've gathered so far when it comes to the creation of objects/models; it's a lot easier to do so within Autodesk Maya then import it into Unity for positioning, lighting, animation etc..

The image the left is screenshot I took of the interface of Unity

Logo above for Unity


To the left you have the navigation panel for the project the user is viewing, the 'FBX' tab are for the models will be visible eg: Maya models/objects. Which when selected the user will be able to position the object anywhere in the scene. 'Prefabs' is basically preset elements that can be used within the scene.
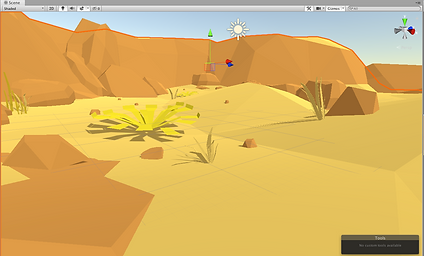


The screenshot above shows the scene that I had open, which if I wanted I could add/remove objects; as well as reposition anything within the scene. The screenshot to the right shows the 'Game' tab, this will allow the user to view the scene and interact with it once pressing the 'play' button on top of the view (pressing 'esc' key will allow the user to backout of the game view tab).
The short clip to the left shows me going into the 'Game' interactive tab, I then back-out of it and go to the 'scene' tab and have a little play around with the rock showing how the shadows show in live time with the game port as well as the scene. I then decide to show more examples by scaling the rock/position and rotate and finally by adding some 'Prefabs' to the scene. Showing a last updated view inside the 'Game' tab moving about.
Below I included a short video of me creating a new scene from scratch within Unity using Prefabs, I then went into the game view and as seen in the video you can't navigate around. To get past this I added a 'Simple Camera Controller' component to the main camera. Then as you can see when I pressed play I was then able to move around within the scene.
- - - - - - - - - - - - - - - - - - - - - - - - - - - - - - - - - - - - - - - - - - - - - - - - - - - - - - - - - - - - - - - - - - - - - - - - - - - - - - - - - - - - -
Week 3- Environment Modeling and Texturing
In week 3 we had a look into environmental modelling and texturing. Unfortunately I wasn't able to add a lot of pictures/videos as they were all saved on my university desktop.


- - - - - - - - - - - - - - - - - - - - - - - - - - - - - - - - - - - - - - - - - - - - - - - - - - - - - - - - - - - - - - - - - - - - - - - - - - - - - - - - - - - - -
Week 4- Lighting
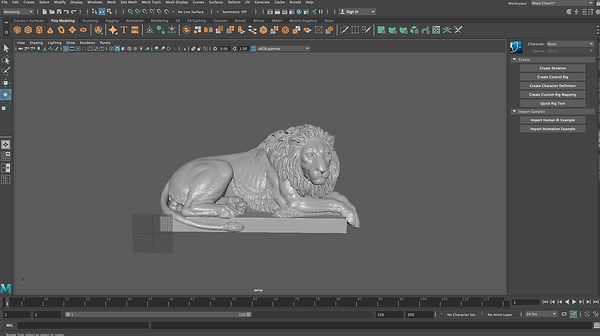
Week 4 we had a look into lighting, there are various types of lighting that can be used an example of this is area light, pin light, spot area etc...
I was then given a 3D model to import into Maya and I played with the various lighting settings to see how each setting effected the model. Below is an example of what I created. Unfortunately due to not having access to my university PC I wasn't able to save all screenshots/screen recordings.


- - - - - - - - - - - - - - - - - - - - - - - - - - - - - - - - - - - - - - - - - - - - - - - - - - - - - - - - - - - - - - - - - - - - - - - - - - - - - - - - - - - - -
Assignment 1: CGI Dimensions of Practice
For assignment 1 I chose to do the following topics:
-
Environment layout and scene organisation (Maya)
-
Environment modelling & texturing (Maya)
I found this task a little challenging as I was working on a laptop and when it came to placement of objects within Maya, I wasn't able to place everything exactly where I would have liked. The most difficult part of this assignment personally for me was the texturing however I watched a few youtube videos as well as lecture videos on UV mapping and got the following results. I did find that the final renders seemed a little bright/grainy however it was the best I was able to produce without distorting the rest of image.

Render 1- Front angled POV

Render 2- Front POV

Render 3- Back angled POV

Render 4- Back POV

Render 5- Wire frame
- - - - - - - - - - - - - - - - - - - - - - - - - - - - - - - - - - - - - - - - - - - - - - - - - - - - - - - - - - - - - - - - - - - - - - - - - - - - - - - - - - - - -
Assignment 2: Materials and Shading
For assignment 2 I chose to model a Red Bull can and then texture it using Autodesk Maya and Adobe Photoshop. I've given a breakdown of how I went about doing this assignment. I took a recording of the whole process but unfortunately the file got courrupted; so I wasn't able to add it.
Rendered Model


Breakdown

Started off with importing a reference image into Maya and started modelling my can

I then jumped into Photoshop, I found a texture of a Red Bull can I wanted to use and made some changes on the design such as adding my name to the can and the module name to the bottom of the can. After I was happy I went into the UV editor, and then wrapped the texture around the can

Using alpha image to apply material on right place

Can materials with alpha image (Hypershade menu)

Can modeled to my liking

I then saw a few YouTube tutorials on how to achieve a 'steel' like material, To get the look I desired I had to make an 'alpha' texture, so I went into Photoshop to create it.

Making Blend material to combine two materials together

Making floor material by showing shadow only
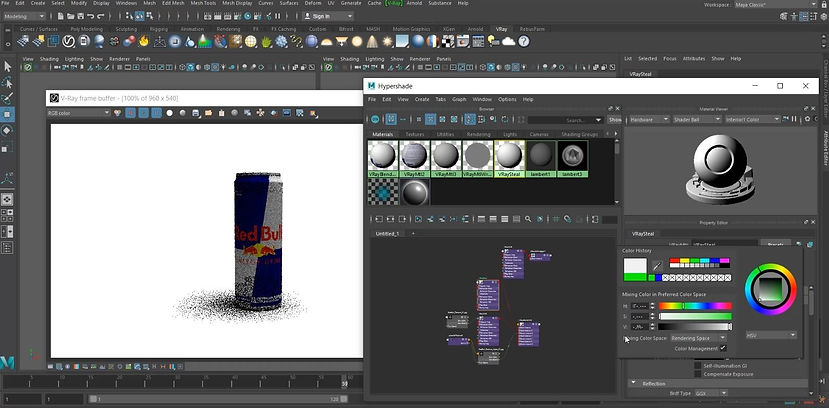
Start rendering and changing colors to my selected preference
- - - - - - - - - - - - - - - - - - - - - - - - - - - - - - - - - - - - - - - - - - - - - - - - - - - - - - - - - - - - - - - - - - - - - - - - - - - - - - - - - - - - -
Assignment 3: Personal Development
For assignment 3 personal development, I thought I'd showcase the different techniques I picked up within Autodesk Maya this year. Along the way I saw a ton of videos online and on YouTube and picked up various techniques and combined them with what I was taught at university. For this project I thought it'd be good to start from scratch and model something I enjoy to play on a regular basis which is a PlayStation; in particular the PlayStation 4 Pro Retro edition. The reason I chose to model the retro edition is because of the nostalgic PlayStation 1 design and it was a little more challenging matching the color schemes other than just doing just a simple black or white.

Black PS4 Pro

White PS4 Pro

Retro PS4 Pro
(The one I decided to model)
Breakdown
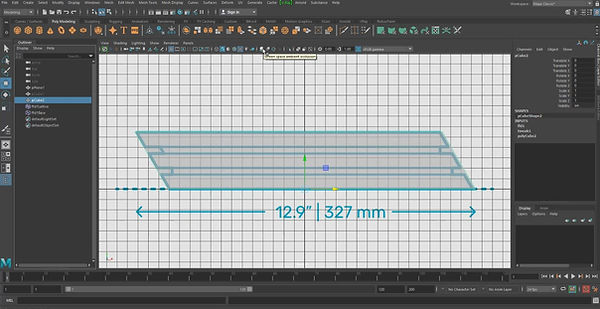
To begin I found some blueprints online of the dimensions of the PlayStation, I then started modeling based on the blueprint model

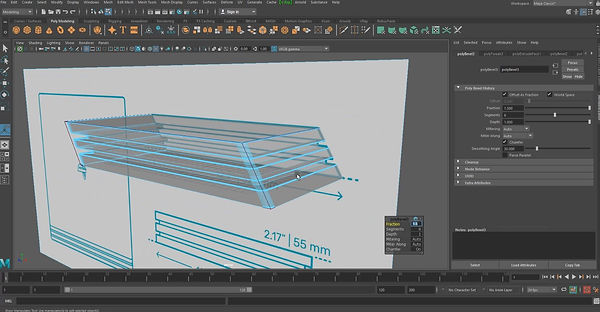
I then attempted to get more details into my model by adding more segments and extort polygons

I then added the SONY and PS4 logo

I then began smoothing edges and corners

I couldn't find any textures online for what I was going for so I decided to head into Adobe Photoshop and create my own textures

I then began adding materials

Adding more textures
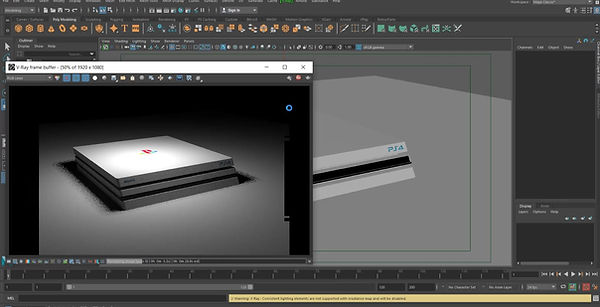

Then I started creating UV maps

I then added the textures to my model in Maya

Adding more materials
(I also made a speed edit of me modeling the entire model so I'll add it at the end so you can see more in depth of how I applied textures/materials)

Rendering model

Rendering model w/ background
Speed Edit
Rendered Model


