Performance Animation
Introduction to Mocap


- - - - - - - - - - - - - - - - - - - - - - - - - - - - - - - - - - - - - - - - - - - - - - - - - - - - - - - - - - - - - - - - - - - - - - - - - - - - - - - - - - - - -


- - - - - - - - - - - - - - - - - - - - - - - - - - - - - - - - - - - - - - - - - - - - - - - - - - - - - - - - - - - - - - - - - - - - - - - - - - - - - - - - - - - - -


- - - - - - - - - - - - - - - - - - - - - - - - - - - - - - - - - - - - - - - - - - - - - - - - - - - - - - - - - - - - - - - - - - - - - - - - - - - - - - - - - - - - -
- - - - - - - - - - - - - - - - - - - - - - - - - - - - - - - - - - - - - - - - - - - - - - - - - - - - - - - - - - - - - - - - - - - - - - - - - - - - - - - - - - - - -
Assignment 1- Motion Capture Setup and Retargeting
For Assignment 1, the task was to setup a motion capture with a rig of our choosing or use one online and then retarget. I chose to go with a rig that I found online from Mixamo.com called 'Y Bot'.
Maya HumanIK Quickrig & Retargeting


Select mirror joint, and select the joints that correspond to each part of the body.

We will go to the blue icon. Edit character definition
To the left is the 'Y Bot' rig I chose from Mixamo.com

I began by importing the 'Y Bot' rig into Maya

Also you can go to: File, import, find our file, select and import. humanIK window by going to window, Animation Editor, HumainIk

Next I created a character definition. For this I will go to: Create, Character Definition. A window will open with the human body and the joints to be defined.
Export Character Definition


Next I exported a file, the template of our mixamo rig in a .hikc file. I then created a folder called mixamo. By doing this if I wished to export anything within the project it'll save the template within that folder. I called thr folder 'Mixamo'.
Maya Time Editor


I then selected .fbx file with the mocap animation I chose from mixamo I wanted to use and dragged it into the time editor.
I then opened up Time Editor. By going to Windows, Animation Editors, Time Editor.


The timeline will then look like this
I then selected the second animation and placed it in the time line editor. For the second animation I synced it so that it follows on from the previous animation.

I then played the animation to see if I was satisfied with everything. I set my playback speed in 'real time'. This can be changed by right clicking on the timeline, playback speed, real-time.
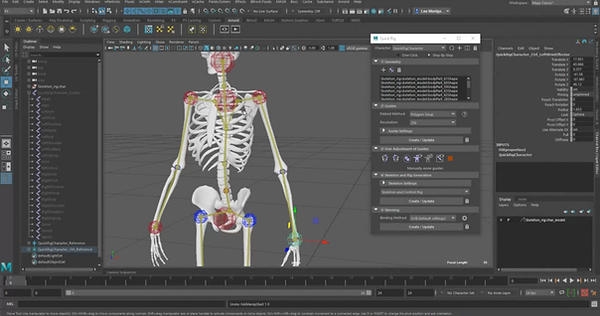
HumanIK Quickrig Custom

I then created a rig using the same model.
Note: To remove the rig we hold down the space key to open the Mata, Skin Unblind Skin bars, erase our skeleton.
Quickrig Tool To Display Menu


In menu 3. User Adjustment of Guides, I selected the joint and selected the mirror.
In Quick Rig menu, I selected the character, step-by-step 5 menus will be displayed:
1.- Geometry
2.-Guides
3.- Uses Adjustment of Guides
4.- Skeleton and Rig Generation
5.- Skinning
In Geometry, I selected the plus icon to add the two meshes of our character.
In guides, Embed Method we place: Polygon Soup and select Create / Update
This creates guides for our skeleton.


Then I readjust the wrist & elbow joints. Pressed the space key to open the various views (Top, Side and Front). With the front and top view, I moved the joint of the wrist and elbow in the correct place.

In menu 4 Skeleton and rig, Select create / update
In menu 5 Skinning, I selected create / update
The Mixamo model already had a rig and controls ready to animate.
Mocap / Retarget Using Quick Rig

I imported the rig with animation, The starting position was a T.
In the time editor I selected -1 to go to frame -1 and not interfere with the main animation.

In the HumanIK menu, I went to Create Character Definition.
We select all the joints of our rig with animation.
Note: Command Select - hi; allows to select all joints faster.

I selected Load Skeleton Definition and selected the mixamo template that I created.

In HumanIK menu, I placed Character: To the character with quickRig and in Source: The animation rig, then played the animation to see the retarget.

Finally I selected the blue icon to rename character and wrote the new name.
Final Submission
- - - - - - - - - - - - - - - - - - - - - - - - - - - - - - - - - - - - - - - - - - - - - - - - - - - - - - - - - - - - - - - - - - - - - - - - - - - - - - - - - - - - -
Assignment 2- Organic Rig
Assignment 2 was to further develop from what we did in assignment 1, we had to demonstrate a variety of techniques which has been taught in the second part of the module; below I've included some of the techniques.
These techniques include:
-
Modelling for deformation.
-
Skinning and painting weights.
-
Blend shapes.
-
Mash elements added to a rig / applied to mocap from the Performance Animation Module.
-
Sub pivot controls for feet.
-
Custom Attributes.
-
Ik handles, Rotate plane solver and single chain solvers.
-
Squash and Stretch.
-
Fur.
-
Bifrost Graph.
Breakdown

To begin I created a lowpoly environment. From a cube, I created the walls of the buildings.


I then used coloured materials for the walls/windows
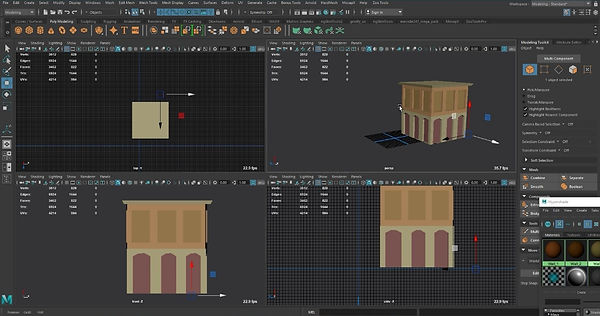
I designed various ceilings and walls for diversity, then duplicating walls to form a building.


I then created buildings of different sizes, playing with the different options that can be obtained by mixing the walls.

After creating a scene with buildings I created trees using spheres and cubes. With the highpoly preview (key 3) will shape the tree to the desired look.


I then duplicated the whole scene to set it

I then redownloaded the rig I used in assignment 1 from mixamo.com but this time without the skin

I then imported the animations that I downloaded into the time editor and applied it to the rig.
Speed Edit

I then imported the model into the scene, and changed the source to 'None' to deactivate the controls.

Finally I rendered the scene, below is the final rendered clip.